
Play + Scalikejdbc +Postgres
Create a new project from scala seed
sbt new playframework/play-scala-seed.g8

Import in IntelliJ IDEA.
Open build.sbt and add:

Open conf/application.conf
Add as following
http://scalikejdbc.org/documentation/playframework-support.html
In plugin.sbt add the following

And enable the reverse plugin at build.sbt
enablePlugins(ScalikejdbcPlugin)Create a configuration file in project/scalikejdbc.properties
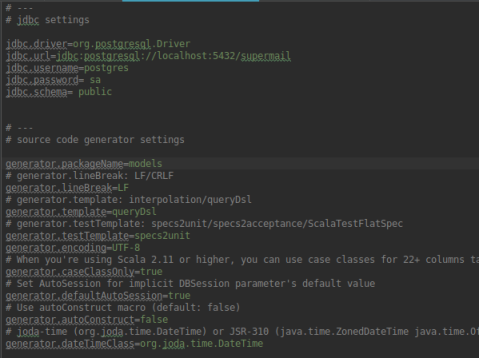
This configuration will allow us to create a model from existing db tables. Next step is to go a terminal (In IntelliJ IDEA there is a Terminal access on the botton, next to sbt terminal) in the root directory of your project and execute:
sbt "scalikejdbcGen messages Messages"
If all configurations are correct you will get a result like this:

After that a models package containing a Messages case class with the implementation of methods for CRUD are created in our project.
However the automation provided is awesome for this type of examples, since our table has a serial id we need to change the signature of our case class to exclude the id and to implement the date automatically (not provided by)
Chimborazo

Majestuoso volcán Chimborazo
Amigos de la blogosfera, tenía muchas ganas de escribir este post. La idea original nació hace algún tiempo, en los años universitarios, tras leer el fantástico libro Travels amongst the great Andes of the Equator del Alpinista británico Edward Whymper pero por innumerables eventos (principalmente el abandono de este blog) nunca se concretó y hoy con el consecuente giro temático del mismo y contando la inspiración necesaria, me pongo manos a la obra.
Por cuestiones de trabajo suelo volar hasta la ciudad de Quito en numerosas ocasiones del año. Es una corta travesía que suele tomar entre 45 y 60 minutos dependiendo de las condiciones climáticas. Cuando estas son benévolas, el trayecto es tranquilo y permite disfrutar una vista a los colosos que se alinean a lo largo de la Avenida de los Volcanes, pero esto no es así siempre, siendo los Andes unos gigantes celosos, se suelen envolver en un manto nuboso que los distancia de ojos mortales.

El vista aérea del Chimborazo. Clic para ver más grande.
Sefaradim
Se me ha hecho muy difícil (y desde que dejé Ecuador diría que ya es imposible) conseguir el documental de cuyo tráiler comparto en este post. Así que con eso simplemente diré que en ese mismo tenor en su momento leí el libro de la Herencia Sefardita de Loja y tengo unas cuantas apreciaciones:
* Se nota que es un trabajo de verdadera pasión y amor. El autor dista de ser un buen escritor pero eso no es mi principal observación. Lamento decir que cuando comencé a leer aquel libro esperaba algo más, sé que la historia de los conversos americanos yace en un lugar de difícil acceso y de la cual casi no existe registro (por obvias razones), pero como lectura de nivel académico deja mucho qué desear el libro del Señor Ordóñez Chiriboga.
* Hay secciones que listan eventos y datos dispersos que son difíciles de contrastar. Y más parece un anecdotario que una investigación.
* El capítulo con el recorrido histórico del pueblo judío es necesario pero sería justo que incluyese un apartado con referencias críticas a la historicidad de tales relatos. (Israel Finkelstein me parece un buen inicio, y los documentales basados en su trabajo son espectaculares)
Reitero, es notorio el esfuerzo del autor pero este libro es válido sólo para una lectura ligera y de similitudes judaicas de los costumbres de nuestra tierra (Costumbrismo). Parece más un (no es queja esto) testimonio de la búsqueda de identidad que tenemos todos y cada uno de los habitantes de la tierra hoy conocida como Ecuador en general, y de los lojanos en particular.
Lo mejor que me dejó la lectura de este libro son las horas de conversación con mi abuelo, a quien le apasiona la historia y este particular tema reavivó en él su curiosidad sobre «las gentes que acá viven, tan diferentes a los pueblos originarios de esta tierra…».
El goce (y el peligro) del audiolibro
Bueno, heme aquí una vez más. Las plantas rodadoras aún pasean por este lugar y sin embargo, volvemos con ganas de escribir, aunque sea unas pocas líneas, pero la ocasión fue adecuada. Si Mahoma no va a la montaña…
La cuestión es la siguiente: Me encanta leer, si bien sumergido en textos técnicos, vídeo – tutoriales y el día a día (lo cual se complica con la cantidad de buenos recursos, series y películas que no sólo salen de Hollywood) encontré en el audiolibro un gran aliado. He de confesar que al principio la mera idea de ser «pasajero» en un viaje (como alguna vez me lo describieron en la Universidad) y escuchar cual (la radionovela de la abuela) me parecía poco atractiva; el hecho de poder conjugar la «lectura» con otras actividades ya no era tan mala idea.
Mientras preparaba el desayuno/iba en el autobús o simplemente durante la limpieza sabatina, el tener al alcance de mis oídos las ideas, datos, historias y reflexiones de aquellos textos para los que «no tenía tiempo» (lo confieso, aprender a organizarme es algo todavía presente en el debe) pasaron a ser mis compañeros de jornada. Del disfrute de la historia, al análisis político (nunca creí llegar a escribir esto), el audiolibro se impuso a la música y a los diversos podcasts que cada tanto escuchaba como píldoras de lo que pasaba en el mundo (Me es difícil y aún no he podido encontrar contenido de calidad sobre la realidad de mi país, así que eso lo dejo para después, porque todo lo disponible está dividido entre «ellos» y «nosotros»)
Pero a la hora de la hora (y a pesar de las valiosas lecciones y datos que aprendí de varios audiolibros) hubo una publicación que me llamó la atención: Black Rednecks and White Liberals (ahora Youtube me bombardea con sus recomendaciones), cuyo autor (Thomas Sowell) pretende mostrar que «la cultura negra no es la verdadera cultura negra estadounidense» y que «los liberales en su afán de ‘ayudar’ han victimizado al negro y por tanto perpetuado el atraso, intensificado la violencia y lo han condenado a ser ciudadanos de segunda, orgullosos de serlo».
Si bien por un lado Sowell (catedrático de color, aunque el prefiere eliminar el estigma de la palabra negro) nos muestra un interesante análisis sobre el desconocimiento de la historia «americana» (en realidad estadounidense) del ciudadano promedio del país más poderoso del mundo, lo cierto es que cada tanto su prosa se ve impregnada de afirmaciones desde el conservadurismo propio de la nación en la que el autor creció. Es loable la producción literaria de Sowell, pero justamente en este libro se nota el principal inconveniente a la hora de abordar tales textos en formato de audio: el narrador (de la versión que yo escuché con una voz serena y casi acorde a la de Don Thomas) suelta alegremente decenas de afirmaciones que dificultan su seguimiento y verificación. Así, por citar un caso, se dice que «un estudio nos demuestra que en el sur estadounidense muchos hijos de esclavos libres veían como actitud «no negra» el esforzarse en el estudio, el aspirar a un buen empleo y sobre todo el no hablar en Ebonics…»
Y he allí la principal desventaja frente al libro impreso (o el ebook, ya que estamos) la ausencia de pies de páginas, anotaciones y erratas (que supongo el original incluye) dificulta ir más allá y contrastar tales afirmaciones, las cuales que se toman como cierta/falsa según la esfera en la que encuentre el lector (o el oyente).
Si algo hay que resaltar del libro (porque no todo es ni puede ser negativo) es que es uno de los pocos textos (al menos para que tipea estas líneas) que busca desmitificar el éxito del pueblo judío y más bien busca encontrar similitudes (o un común denominador, si gustan) con miembros de otras naciones (o pueblos) que encontraron éxito lejos de su hogar de origen (libaneses en Brasil y en África, japoneses en Perú o chinos en Indonesia y otras naciones del sur asiático). Lejos del relato de «el pueblo elegido», las condiciones de vida, el arraigo con su gente y el valor del estudio (el conocimiento como un recurso que no ocupa espacio en la valija) se sopesan como hipótesis que explican(en realidad que explicarían, aunque el autor lo pone como un hecho) el éxito de aquellos grupos humanos. Pero otra vez, sin citas a otros estudios, siempre queda la impresión de guardarse algo para sí.
Y bueno, luego está el subtexto de «los pobres son pobres porque quieren» o porque «su victimismo no les permite progresar», afirmaciones que nacen de la meritocracia más falaz. Y eso es arena de otro costal. Para concluir este corto post, el audiolibro es válido para la ficción y es muy útil para aprender idiomas, por lo demás me quedo con el libro impreso.
Trick
How to «debug» the old school way, open DevTools and on console type:
document.querySelectorAll('*').forEach(ele => ele.style.cssText = 'border:1px solid red')Downtown Quito
If I had to suggest a place to visit while touring in Ecuador I would advise you to go downtown Quito. Although San Francisco de Quito, Ecuador’s capital city has grown as a vibrant metropolis with modern buildings and neighborhoods, what truly pays the visit of this city is its lovely colonial district (Centro Histórico). Hundreds of well-preserved buildings and churches of the Spanish Empire era can be found in this area. While walking through its narrow cobblestone streets you will feel like traveling back in time. Visiting the Church of «Compañia de Jesús» is a must. This magnificent church is one of the best examples of Baroque of Quito style being its most representative features the church’s volcanic rock facade and the imposing gold leaf details of its interior. It is, without a doubt Quito’s crown jewel, a place where the spirituality of its people meets the splendor of a long bygone era.
Setting up a project for Testing with Selenium WebDriver
Prerequisites:
- Java 8+
- IDE: Eclipse.
- Apache Maven
- Create a Maven project with the option skip archetype selection.
- Add dependencies(selenium-java and TestNG* -can be replaced by JUnit-) to pom.xml. (hint can be found at https://mvnrepository.com)
- Create a TestNG class in src/test.
- Execute test.
Get TestNG eclipse plugin here: https://marketplace.eclipse.org/content/testng-eclipse
Do not forget to Download the Driver for your Browser (Chrome, although support for other exist)
Reactive ScalaJdbc with Flyway Play
- Postgres Driver /
- Flyway to add reactive non-blocking: flyway/flyway-play (play 2.4 +)/
- Scalikejdbc-async here
- Edit conf/application.conf add
play.modules.enabled += "org.flywaydb.play.PlayModule"
- postgresql-async (More and in depth analysis here)
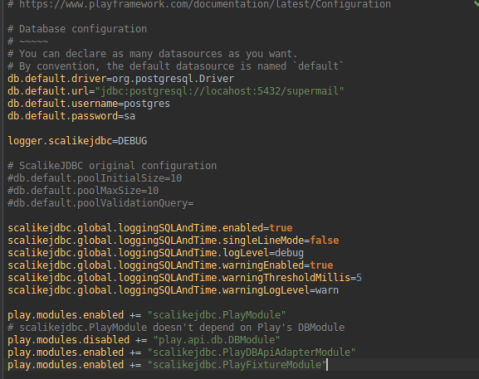
Add in conf/application.conf
# https://www.playframework.com/documentation/latest/Configuration
play.modules.enabled += "org.flywaydb.play.PlayModule"

# https://www.playframework.com/documentation/latest/Configuration

# Database configuration
# ~~~~~
# You can declare as many datasources as you want.
# By convention, the default datasource is named `default`
db.default.driver=org.postgresql.Driver
db.default.url="jdbc:postgresql://locahost:5432/playapp"
db.default.username=postgres
db.default.password=sa

logger.scalikejdbc=DEBUG

# ScalikeJDBC original configuration
#db.default.poolInitialSize=10
#db.default.poolMaxSize=10
#db.default.poolValidationQuery=

scalikejdbc.global.loggingSQLAndTime.enabled=true
scalikejdbc.global.loggingSQLAndTime.singleLineMode=false
scalikejdbc.global.loggingSQLAndTime.logLevel=debug
scalikejdbc.global.loggingSQLAndTime.warningEnabled=true
scalikejdbc.global.loggingSQLAndTime.warningThresholdMillis=5
scalikejdbc.global.loggingSQLAndTime.warningLogLevel=warn

play.modules.enabled += "scalikejdbc.PlayModule"
- Implement SuperMail model
- Create REST endpoints
- Add to routes
GET        /bars:username                   controllers.Application.getSuperMails(username: String)
POST       /bars                   controllers.Application.createSuperMail
- Implement Controller
- Test
Original reactive post here.
More details to handle request here (Official lightbend)
Vagrant Lab for Postgres
Since a few days ago I’ve played (wink, wink) with Play, Lagom and Reactive Systems, I’ve found in the need of trying Some Scala and implement a REST API to access a Postgres Database, so instead of downloading, installing and configuring a database in my local machine I’ve felt tempted to use Vagrant instead.
Vagrant you say?
Vagrant is a tool for building and managing virtual machine environments in a single workflow. This tools “packages” our special box which is a small VM. A remarkable aspect is Vagrant relies on “providers” for virtualization. In this case, we’ll proceed first to install both Vagrant AND Virtualbox.
The beauty of Vagrant is that several boxes with preconfigured OSs, tools and services are ready to be implemented. Just search here for a Vagrant box of your needs.
Prerequisites:
- Vagrant.
- VirtualBox
sudo apt install virtualbox-qt
sudo apt install vagrant
Let’s get to it!
Get Postgres Vagrant box.
Open a Terminal. Create a directory in which you will download and place your Vagrant Machine.

The previous image comprises the following actions we have performed:
- Create a Postgres_Vagrant directory
- Download our Vagrant box.
- Open Vagranfile for this box.
Uncomment the following line of Vagrantfile
config.vm.network "private_network", ip: "192.168.33.10"
Add
config.vm.network "forwarded_port", guest: 5432, host: 5432, host_ip: "127.0.0.1"
Save and close the Vagrantfile. Go back to your terminal and execute
vagrant up
This command will start the vm for this exercise.
Now we open VirtualBox and effectively our vm is ready.
That’s all! Now we can focus our effort on building our REST API to access a database, but that’s for another day).
Edit!
Since I’m now in Russia, the Postgresql locale was set to «ru_RU.UTF-8», but it’s necessary to change it to support locale to match my language «en_US.UTF-8».

Change it like this

Thanks faqforge!
Reactive System (and 3)
This tutorial starts here and the second part continues here. Do not forget to start at the beginning.
Part VI: Create a simple frontend App for our System.
- Create a new Scala module (microservice) for our project.
- Create the package.
- Create model WFForm
- Implement controllers.
- create package controllers
- create WFAbstractController
- WFConsumerController
- WFController
To be continued…
WF Reactive System (2)
In previous post (available here.) we gave a try to Lagom and reactive microservices. We started by creating a sample Weather forecast App with three reactive microservices. Starting by the preparation and setup of tools needed, and the creation of service API and its implementation for the producer service that will deal with request that User will generate from a future UI (We’ll have the chance of play with Play framework).
In this part, we’ll create a consumer API and its implementation.
Part IV: Consumer API
- Open the project in the IDE and create a copy of the producer module and rename it as wf-consumer-api.
- Add this module to build.sbt.
- Go to model and refactor (rename):
- WFMessage to WeatherForecasting.
- Modify the Service API:
- Remove topic
- Change descriptor name to «wfconsumer».
- Define functions to:
- Get Top Ten Weather Forecasts.
- Get one (the first) Weather Forecast. (findOneWFData)
- Get the latest Weather Forecast. (latestWF)
- Define the rest endpoints URI in descriptor to our consumer.
- Get for (findTopTenWFData)
- Get for (latestWF)
- Get for (latestWF)
- Remove the withTopics and withAutoAcl options of descriptor.
Part V: Implementing the Consumer Services
- Create model package and create the case class WeatherForecasting.
- Create companion object for Json serialization format.
- Modify the consumer’s WFCommand
- Extend ReplyType[T] (previously [Done])
- Create SaveNewWF case class and its companion object.
- Delete WF case class and its companion object.
- Rename WFSerializerRegistry to WFConsumerSerializerRegistry
- Add class to WFSerializerRegistry.
- EventTag does not require modification.
- Modify WFEvent. Refactor WFChanged to WFSaved and change its signature to receive a WeatherForecast object as parameter.
- Remove onReadOnlyCommand
- In onEvent change case and add message for detail of message.
- Modify WFEntity to implement saving messages to handle onCommand and on Event operations for all WFEvents. It is very important to note that this Entity manages components of CQRS/ES architecture.
- Modify WFLoader.
- Rename it to WFConsumerLoader
- Override load and loadDEvMode.
- Change abstract class WFConsumerApplication
- Add lazy vals for binding WFService client wfService and message repository (WFRepository).
- Override jsonSerializerRegistry.
- Add persistentEntityRegistry
- Add readSide.register(wire[WFEventProcessor])
- Implement WFRepository.
- Create package repositories.
- Create private [impl] class WFRepository its constructor receives CassandraSession.
- Implement method for data fetching according to rest endpoints:
- fetchWFData: to retrieve 10 elements
- fetchOneWFData: to retrieve one (first) register.
- Implement Consumer Service
- Create class WFConsumerServiceImpl.
- Override findTopTenWFData and findOneWFData
- change Loader in resources/application.conf
- Add binds to build.sbt.
In the next post, we’ll create a simple frontend for our Reactive System.
![]()
